So when I come to a customer it isn’t that unusual that they have a Certificate Authority that they use for internal systems. But I don’t want to install their CA as a trusted CA on my laptop. Who knows what they have been up to.
There are some kinks. Not all SSL implementations have support or care about nameConstraints that I am using. But luckily for me Windows does. So I have my own CA that I use to sign all my customers CA’s and limit them to domains I see fit.
So first of lets get openssl installed on your machine. Lets go to Shining Light Productions, now you might ask why not take it from the source OpenSSL. The reason is that OpenSSL does not distribute compiled versions, so you can get the source and compile or get it from Shining Light and be happy.
Now lets start with creating our own private CA and key. We will install this one on our machine as a Root CA. The key we need to keep if we want to sign other CA’s down the road. Also if anyone gets your key they can create fake certificates to trick you, so putting it on your homepage is a bad idea.
Putting it all together
I am creating a CA that lives for 10 years. Not really needed but why not. I installed my binaries in the root of the C drive, but just change the path as required. I’m going to create a folder to work within first.
mkdir \temp\RootCA
cd \temp\RootCA
\OpenSSL-Win64\bin\openssl req -nodes -new -x509 -days 3650  -newkey rsa:4096 -sha256 -out virot-root.crt -keyout virot-root.key -subj "/CN=Virot Customer Root 2019"
Congratulations you do now have a new CA certificate and a key. Lets download a CA that we want to restrict and put it the same folder. If the file isn’t in PEM format you need to add -inform der. So for this I decided just to play with Googles CA, It might not be a smart thing to do this as you can break things signed by them. I downloaded giag2.crt from https://pki.google.com/. Now lets create the file that will help us. I am calling it nameCons-google.cfg and placing it in the same folder.
[req]
prompt=no
req_extensions=nameCons

[nameCons]
basicConstraints=critical,CA:true
nameConstraints=critical,permitted;DNS:.google.com
And now to create the cross signed intermediate certificate. This will create a signed version by your root CA that allows only some domains.
\OpenSSL-Win64\bin\openssl x509 -inform der -in GIAG2.crt -CA virot-root.crt -CAkey virot-root.key -days 3650 -set_serial 1 -sha256 -extensions nameCons -extfile nameCons.cfg -out domain-cross-ca-google.crt
You will get some warnings with the google certificate. But I haven’t seen that with my customers certificates. Now we have a brand spanking certificate that limits what that issuer can do.
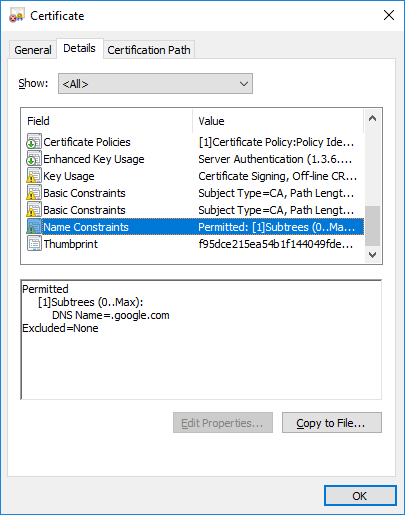
So now if we install this root certificate and the newly created intermediate in my machine. Windows will start limiting things signed by this certificate to the google.com domains.
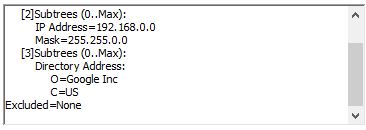
So if we want more domains or excluding some domains. Lets do the same with other google domains. Just add them at the end with extra permitted or excluded sections.
[req]
 prompt=no
 req_extensions=nameCons
 [nameCons]
 basicConstraints=critical,CA:true
 nameConstraints=critical,permitted;DNS:.google.com,permitted;DNS:google.com,excluded;DNS:.bad.google.com
You can even add other types as IP or dirName. Almost all SubjectAltName directives are usable, with the exception of mail. Leaving with a nameCons that dows both an IP and DirName.
[req]
 prompt=no
 req_extensions=nameCons
[nameCons]
 basicConstraints=critical,CA:true
 nameConstraints=critical,permitted;DNS:.google.com,permitted;IP:192.168.0.0/255.255.0.0,permitted;dirName:Dir
[Dir]
 C=US
 O=Google Inc
Now remember. You need to install both your Root Certificate AND the cross signed root certificate.